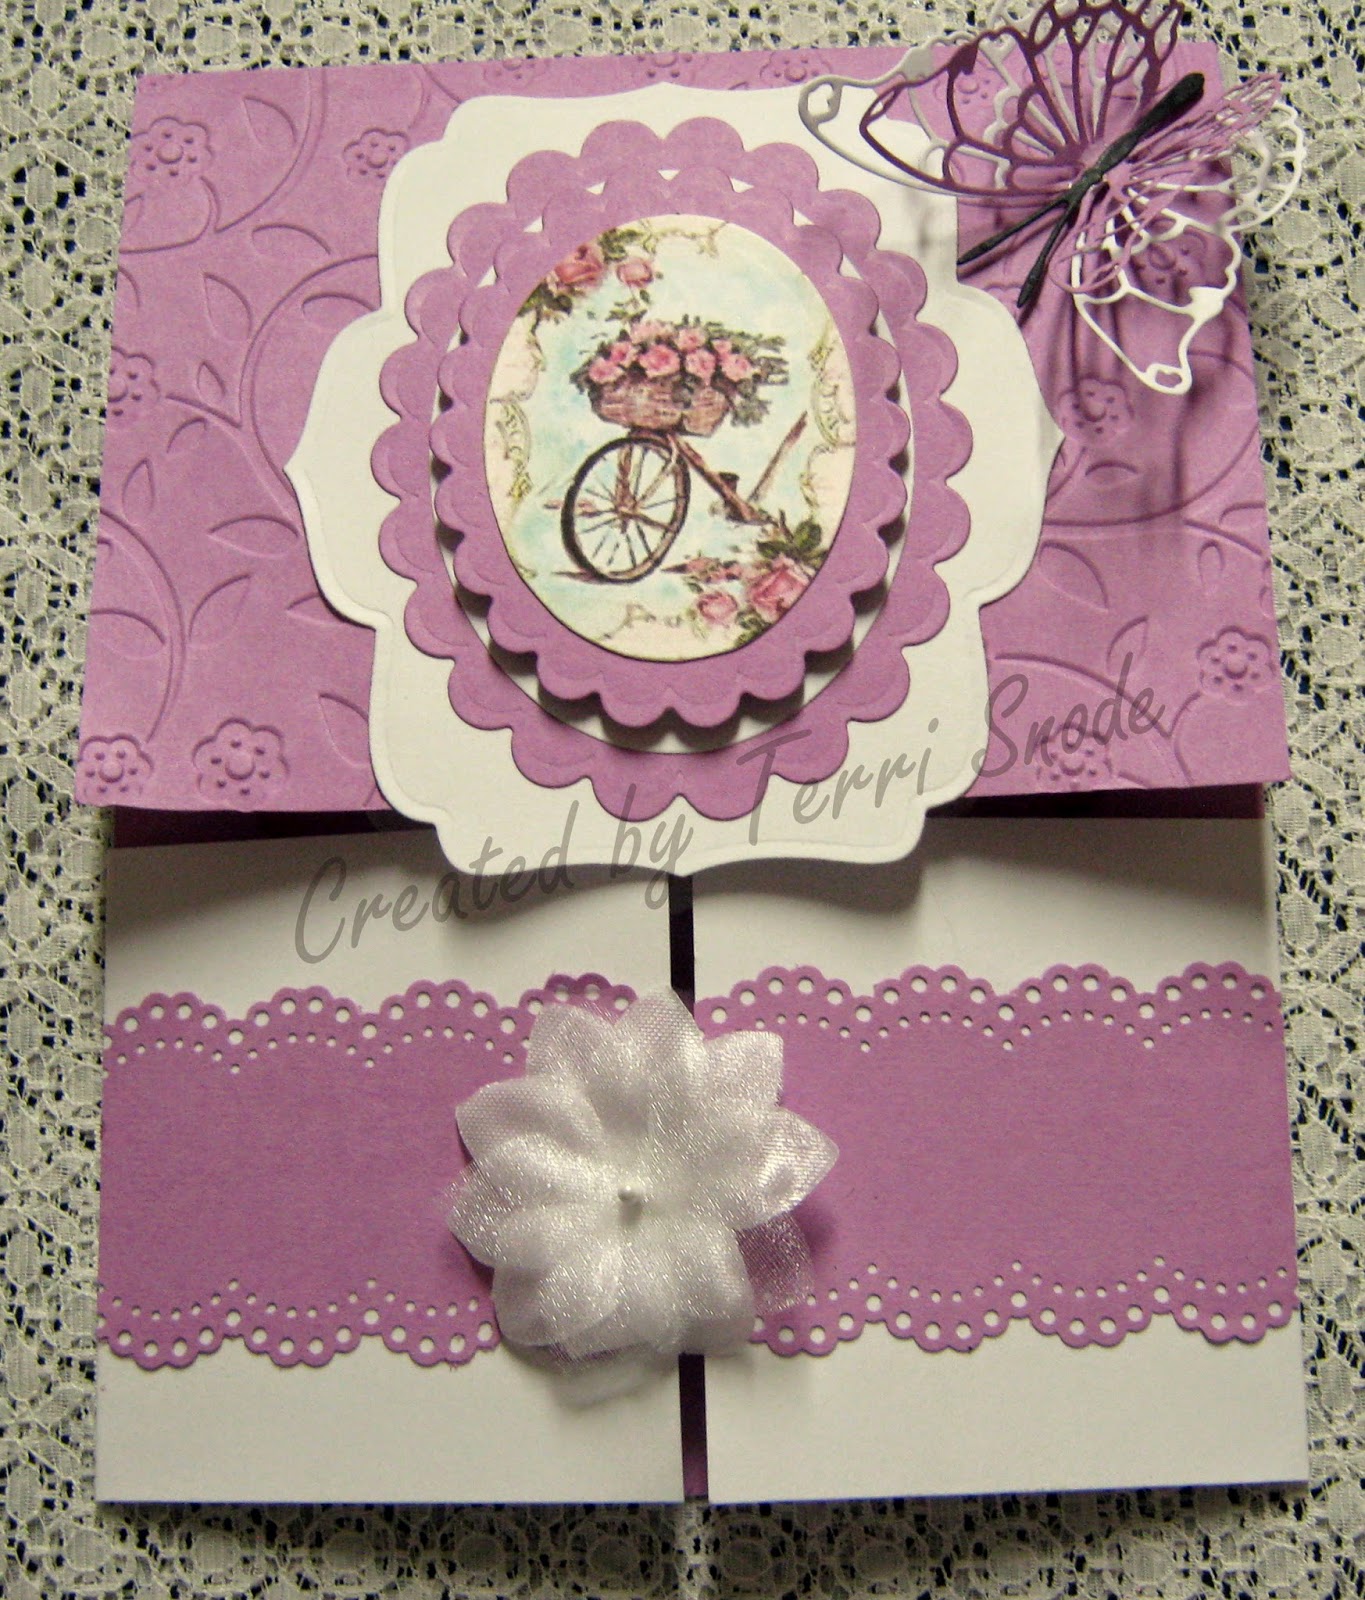
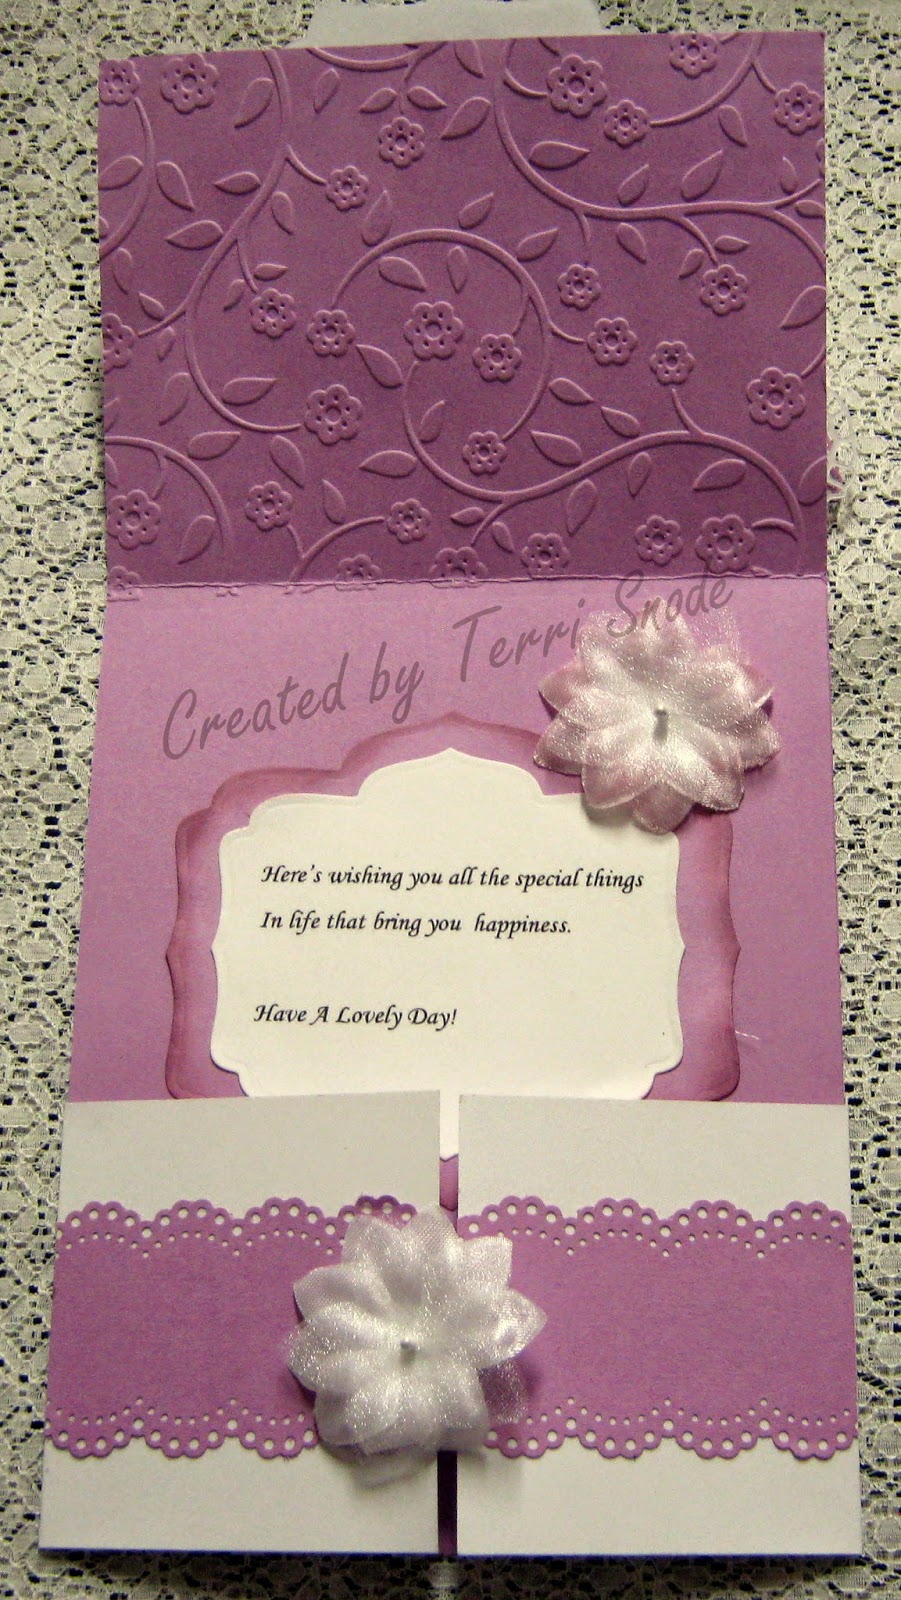
Thursday, August 28, 2014

Double Dutch

There are so many fancy fold cards on Pinterest and I have been trying to get brave enough to make some. So today I want to share a double dutch card. It was so easy to make and I really like the way it turned out. Wish I had spotted this card before I did my project for the Sisterhood's challenge "Fancy Folds", which I am hosting.

 closed

 half opened


open


Recipe:

Cardstock: White, SU Soft Plum, Black
Ink: Soft Plum
Embossing Folder: Darice 
Dies: Nestibilities Ovals, Scalloped Ovals, Labels Five, Memory Box Butterfly
Punch: Martha Stewart Eyelet Scallop Punch
Embellishments: White Wedding Flowers

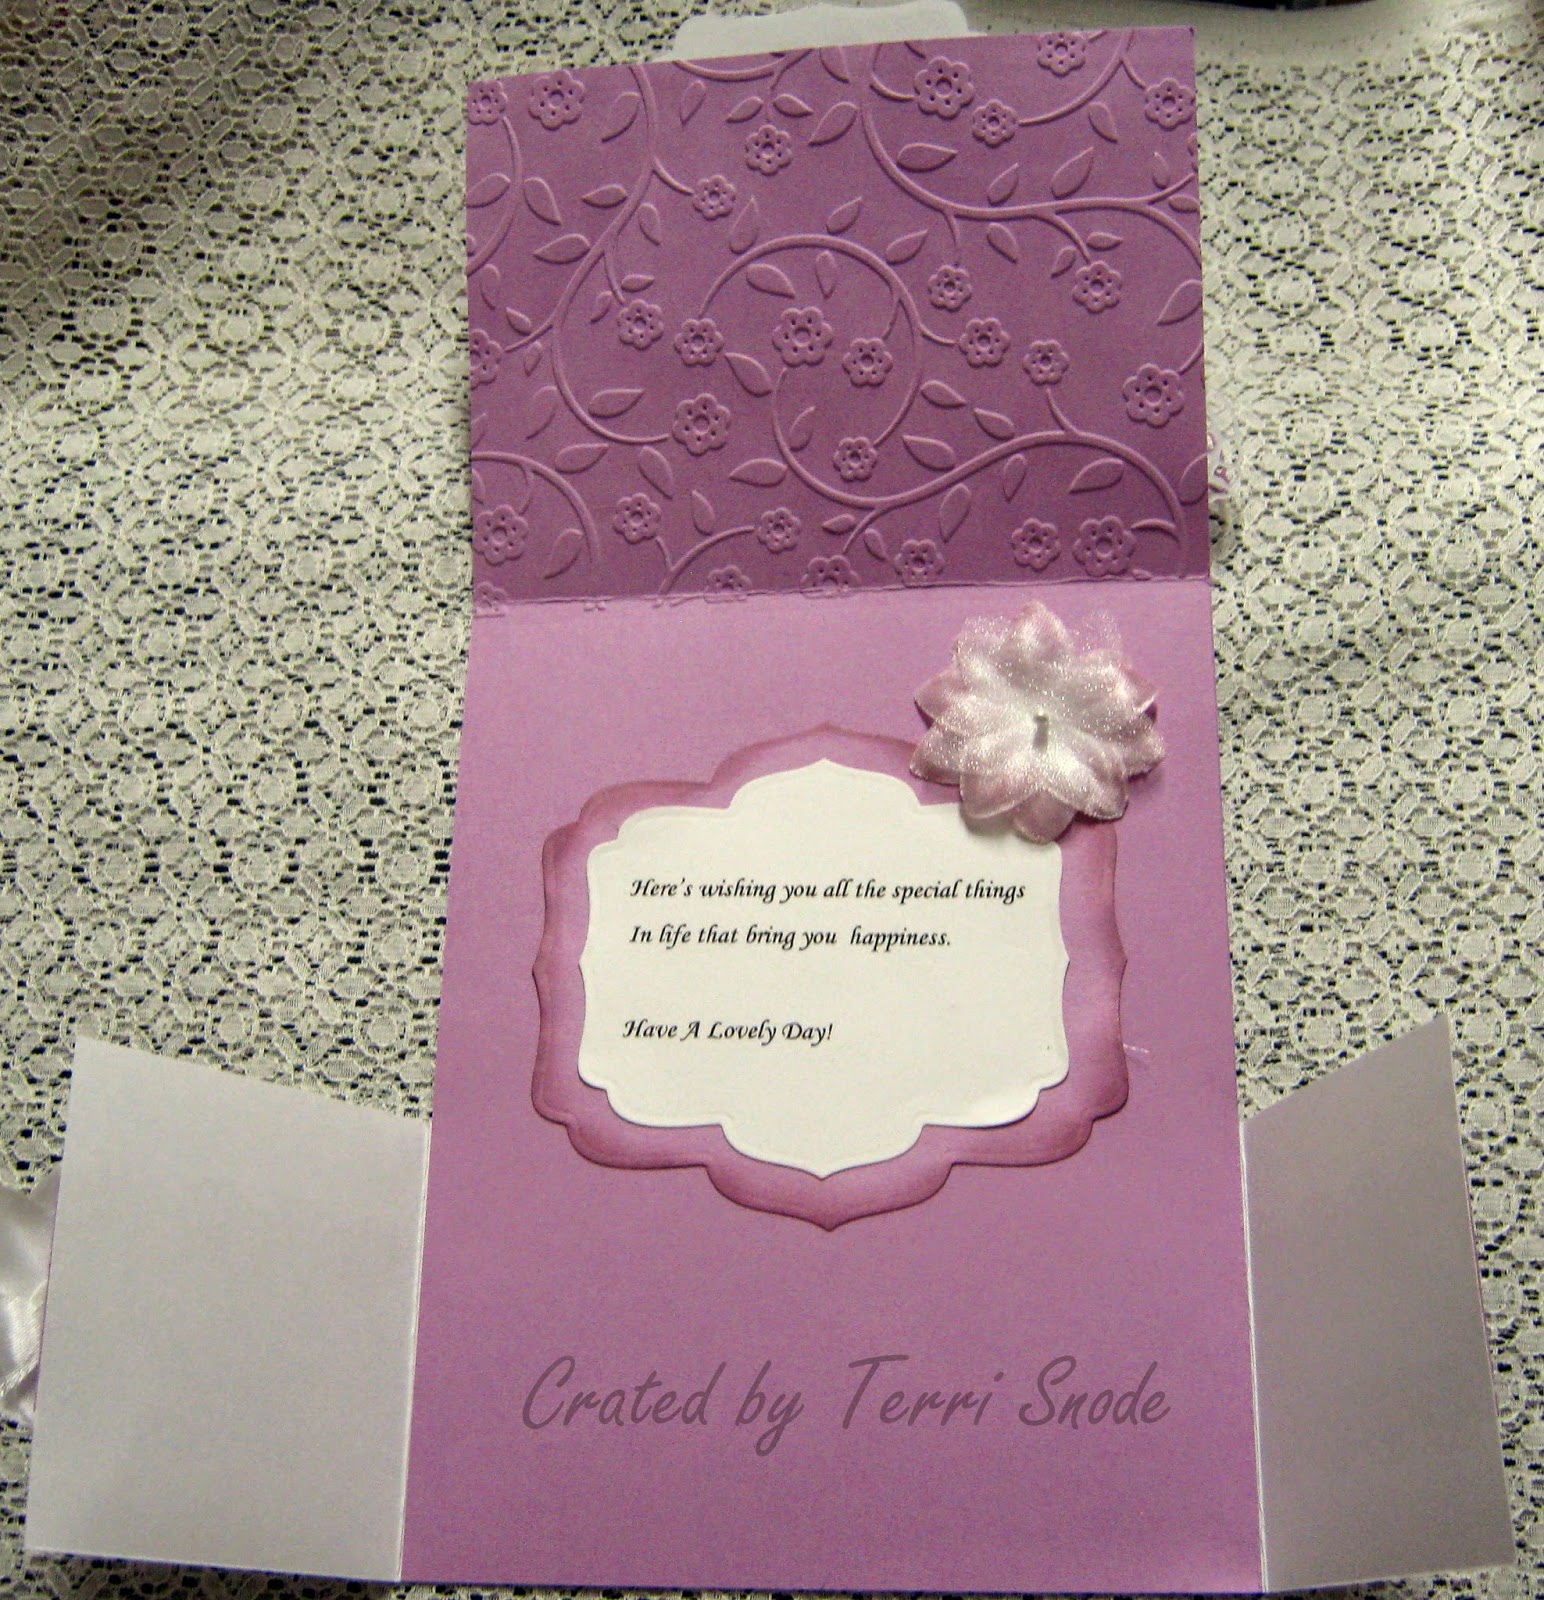
When I embossed my top fold, I didn't realize that I had the embossing folder turned the wrong way, so it is debossed. But I thought it looked kinda nice that way and left it. The frame for the sentiment panel was sponged with SU soft plum ink. I also sponged the flower with the soft plum. I found the image and the sentiment on Pinterest.

It is hard to tell from the picture, but the butterfly was cut from white and soft plum cardstock, then glued together for dimension. The body and antenna were cut from black cardstock. Now that I know how easy this card is to make, I will definitely be creating more.

Don't forget to stop by the Sisterhood and check out the new challenge "Fancy Fold" cards. The Sistahs have some fantastic projects for inspiration. 

Thanks for visiting with me today.

Terri


Wednesday, August 27, 2014

Open the Gate

I am so excited to be the hostess for the Sisterhood of Crafters challenge this week. I always forget about all the different ways to fold cards, so this will be a great challenge for me. I decided to make a gate fold card. (One of these days, I might get brave enough to try a step card.) Now for the details of my project.

closed


open


Recipe:

Cardstock: Teal, White

Designer Paper: Colorbok Jewel Box

Dies: Labels One

Punches: Large and Small Tag Punches

Ink: Momento Black

Embellishments: Large rose and white lace


Okay, now it's your turn. Head on over to the Sisterhood for more inspiration from the "sistahs" and enter your creations. Who knows, you could be our next "Top Sister".

Terri

Monday, August 25, 2014

Make a Note

I have been fighting an ear infection all weekend and just didn't feel much like working on projects. When my hubby and I went to the grocery store I purchased some ear drops and that helped to get me into the mood for crafting. Darlene has a fabulous tutorial for these notepads and I just had to try them. They are super easy and will make wonderful gifts or craft show items. You can find the tutorial here.  Now for my creations:


For the note pad holder I used SU and Core'dinations cardstock as the base. The designer papers are from various companies also, such as DCWV, K & Company, etc. The embellishments are from Tim Holtz, Minds Eye and K & Company. The stamp was from a 3 pack of stamps purchased for $2.00 at Michaels.
I will package the note pads in a plastic bag along with a pencil or pen.

I need to get all of my craft items together and see how much I have to sell. I'm sure I will need to make more of everything, but want to concentrate on what I need the most.

That's it for today. I think I need to use my ear drops again and lay down for awhile. Don't forget to stop by the Sisterhood on Wednesday for our next challenge.

Terri

Friday, August 22, 2014

Bubble, Bubble, Toil and Trouble

Still working on items for my craft show in October and wanted to share these gum pack covers with you. All of the images were made using the 1 3/8" scallop punch and wiggle eyes.


Instructions:

1. Cut cardstock 3" by 6 1/2". 
2. Score on the long side at 1 1/2", 2", 4 1/2" and 5".
3. Wrap cardstock around "Extra" bubble gum and secure with sticky tape.
4. Decorate as desired. 

Easy and quick craft for all those little monsters that show up at your door on Halloween. Unfortunately, we don't get trick or treaters on our street. There are only 5 houses on our street and the kids are all grown up. My grandchildren will get these in their Halloween treat baskets.

Okay, off to work on more craft show items. If you make any of these covers, I would love to see pictures of your creations.

As always, thanks for stopping by.

Terri

Wednesday, August 20, 2014

Trick or Treat

Yesterday I started working on some Halloween treats for a craft show on October 4th. Normally, I don't do Halloween, but since this craft show is early I decided I should do a few items for the kids. Will also make some for my grandchildren. This Hershey bar slider is a very quick and simple project. My friend, Darlene, has a tutorial here


I used cardstock from various companies (Stampin' Up, DCWV, Coredinations) and the image stamps I picked up for $1.00 at a local scrapbooking store. 

I also need to work on more cards (of all types), Hersey bar sliders, gum pack wrappers, nugget boxes, travel kleenex boxes and other items for Christmas craft shows. As the saying goes "so much to do and so little time."

Thanks for visiting with me today and don't forget to stop by the Sisterhood for our "Favorite Color" challenge. You have until 8pm Sunday, August 24th to enter.

Terri

Monday, August 18, 2014

Nail It

Hello everyone! Today I would like to share a project that caught my eye on Pinterest. Thought this would make a great stocking stuffer or maybe a simple gift for a co-worker, hair dresser, etc. The tutorial for this box is by Heidi Baks and can be found here. A big thanks to Heidi for sharing this idea. This is an easy quick project. I think I will cut out a few boxes and put them together while watching TV with my husband. They should do well at craft shows, just need to decide on a price. Tomorrow I will have to purchase some small bottles of lotion and emery boards to put in them.

The box is cut from SU Marigold Morning cardstock and the designer paper is from DCWV's Floral Fair paper stack. Blue satin ribbon was tied around the bottle. I used the 3/4" circle punch from SU for the hole on the back panel. That's all there is to it.

Have I motivated you to give this project a try? Let me know what you think. I love receiving comments about my work.

Stop by again soon.

Terri
 

Thursday, August 14, 2014

Chipboard Coaster Post-It-Note Holder

When organizing my craft room, I found my chipboard coasters and decided to start making projects with them again. It has been 2 years since I used them. You know the old saying, "Out of sight, out of mind." Time to start using some of those materials that had been packed away and are now neatly organized so I can find them. This project is soooo easy. Just need Mod Podge, brush, designer paper, 4" x 4" chipboard coasters (purchased my from ebay) and post-it-notes. 


I think I will make some of these as stocking stuffers for my family and give them as gifts to my friends. They will also be sold at craft shows. I added paper flowers with glue dots and tied the ribbon around a clip. The designer paper is by DCWV and has been in my stash forever.

Well, time to get ready for my stamp group meeting to night. Thanks for dropping by and visiting.

Don't forget to stop by the Sisterhood and join in our new challenge using your "Favorite Color". The sistah's have provided some wonderful projects for inspiration.

Have a great day.

Terri
 

Wednesday, August 13, 2014

Choose Your Color

Today's challenge at the Sisterhood of Crafters is to use your "favorite color". My family and most of my friends know that blue is my favorite color. I found this tutorial by Diane Dimich on YouTube and decided to give it a try. The box is made using the Envelope Punch Board and SU's  Score Plate. Diane takes you through step by step and makes it so easy to create the matchbox. Depending on how you decorate your box, it could be used for birthday, wedding, anniversary, Halloween or baby shower favors. I will definitely be making more.


Here's the recipe:

Cardstock: SU Brights Collection double sided 
                        SU Turquois
                  Silver

Die: Memory Box Whimsy Circle

Flowers: Mikies Flower Favor Embellishments

Why not stop by the Sisterhood and play along? The "sistahs" have some beautiful creations to give you more inspiration.

Until next time...

Terri

Tuesday, August 12, 2014

When Will It End

What a week this has been!! One of our dogs has been sick, so after a trip to the vet, two meds, change in diet and hoping that within a couple of weeks she is back to normal. Unfortunately, we have to keep her in the garage for now. Just thankful we are dealing with this now and not over the winter months. Then my hubby's car started having issues, so we decided to trade it in. The paper work for the new (used) car should be completed tomorrow. While starting to buy groceries yesterday, my younger daughter called and asked if I could pick her up and take her to my granddaughter's check up because just as she started to leave the house, it was a down pour. She doesn't drive and didn't have an umbrella. So grocery shopping will have to be done  sometime today along with a haircut. I am in withdrawal because I haven't been able to do any crafting. I am going to try to get some crafting done this afternoon and evening while hubby is at work. My order from Stampin' Up cardstock arrived yesterday and I can't wait to start using it. Hope to have some new projects to share with you tomorrow. 

Until then...

Terri

Friday, August 8, 2014

Step Up

Today I would like to share a card that I made for my oldest granddaughter's birthday. She will turn 7 on September 28th and she is becoming quite the young lady. I asked her what she wanted for her birthday and she replied, "Gragra, it's supposed to be a secret." After explaining I just needed to know if she likes to make crafts, read or play with something special, I got the following answer. "I like anything Barbie or Tinkerbell, books on a Level 1-2 and making crafts. Now on to the card:


The card base is white cardstock and the designer paper for the background and the flower panels is from DCWV's Flower Shower Spring Stack. The frame around the image was cut using a Nestibilities scalloped die from SU Old Olive cardstock. Both sentiments came from a free stamp set I received with a UK Papercrafts magazine. I used a Martha Stewart punch for the picket fence and the flowers are from Petaloo. Joann Craft Store colored pencils were used to color the image that was stamped with Memento Tuxedo Black Ink.

With the card done, now I just have to shop for her gifts.

Thanks for spending time with me today. Stop by again soon.

Terri 
 

Tuesday, August 5, 2014

Pirate Party

My grandson will be four years old at the end of this month and my daughter is planning a pirate party for him. He loves Jake and the Neverland Pirates, so of course I had to put pirates on his card. He is such a sweet little guy and still loves to sit on Grandma's lap. I treasure that time with him, because I know it won't be long before he will be too old for all that gushy stuff. Now for my creation:

 Closed


 Open


Recipe:

Base: white cardstock

Designer Paper: Authentique Paper stack by AuthentiquePaper.com

Jake and the Pirates: printed on my computer

Sentiments: Happy Birthday - Impression Obsession Die
                    "Swashbucklin" good time" printed on my computer

Embellishment: SU red twine


The "Happy Birthday" die cut and the striped designer paper looks blue, but both are really black. Off to work on more challenges and craft show projects.
Thanks for stopping by and have a wonderful day.

Terri